Sometimes manufacturers of laptops or computers specifically optimize the parameters of the BIOS subsystem for a specific version of the Windows operating system. If you try to reinstall and run another version on such a computer, you can get the system error "The BIOS in this system is not fully ACPI compliant." What to do in this situation, few people know. But after reading the article to the end you will get rid of this problem and learn how to fix it in the future.

The content of the article:
- Что значит ошибка BIOS? 1 What does a BIOS error mean?
- Ошибка в BIOS при установке Windows XP 2 BIOS error when installing Windows XP
- Сброс параметров BIOS 3 Reset BIOS settings
- Настройка параметров BIOS 4 Setting BIOS Parameters
- Другие способы устранить ошибку 5 Other ways to fix the error
What does a BIOS error mean?
Literally, the text of the error is translated as follows: the BIOS in the system is not compatible or not fully compatible with ACPI. ACPI is the configuration of the power system settings in a device. Its configuration can be made both from the BIOS and using the tools of the operating system. Simply put - this specification (ACPI) fully controls the power consumption of a computer. If an error occurs, then some modules or components of the computer do not receive the necessary power from the distribution unit (computer power supply).
This is not the only ACPI feature. It also allows configuration for Plug and Play devices. This is done with the help of OS. The user has 2 ways to solve this problem - either find the BIOS update and install it, or configure the settings for a specific operating system.
BIOS error when installing Windows XP
When installing Windows XP, the error "The BIOS in this system in not fully ACPI compliant" may also occur. In this case, you must press the F7 key during installation in text mode. In this case, the system will automatically disable ACPI and the installation can continue.
BIOS reset
Settings in some cases may vary. For example, when the computer crashes. Therefore, you should try to reset the BIOS settings to the default.
- To do this, the computer must be restarted by clicking on the “Reset” button on the case of the system unit or programmatically, by clicking the “Start” button and selecting “Restart” from several options.
- Next you need to enter the BIOS subsystem. To do this, press the corresponding key when the boot screen saver appears. To find out the key, you need to look at the “Press DEL to run setup” startup screen. From this message you can see that the key for entering the BIOS DEL.

String to determine the BIOS setup key - The key must be pressed and held for a while until the BIOS screen appears.
- Then you need to find the item "Load Default BIOS". This item may be called differently, it all depends on the version of the Base Input-Output System and the motherboard manufacturer.

Reset BIOS settings to default - You must select this item and confirm the reset by pressing F10.
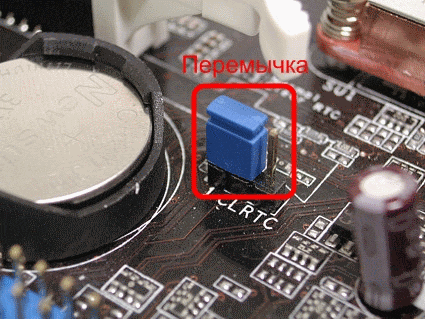
You can reset the settings in another way without searching for the parameters and items of the subsystem. To do this, it is necessary to remove the inspection cover of the system unit and find the battery on the motherboard. It has the size of a medium button, usually metallic in color. It must be removed for 10 minutes, prying with a sharp object. After that, the battery must be returned to the cell and close the inspection cover.

Not far from the battery on the motherboard is a special jumper. It is signed by “CLRTC” or “CLRMOS. The jumper closes 2 contacts out of 3. To reset the settings, it must be moved to the other 2 contacts (only 2 positions, it is difficult to make a mistake). On new motherboards, instead of jumpers, developers make ordinary buttons that, when pressed, reset the BIOS settings.
Configuring BIOS Settings
Now we will try to solve the error with the BIOS and ACPI using manual parameter settings. To do this, you need to re-enter the subsystem. In it you need to find a parameter that will be called one of the options: OS Type, OS Selection, OS Optimized Defaults. Perhaps in your BIOS version the name will be different from the ones provided. As you can see, in any case, there should be a particle OS (Operating System).
After you find this item and open it, there will be several versions of Windows to choose from. It is easy to guess, you will need to choose the one that is installed on your computer at the moment. There is also a variant Other OS (other). You need to select it if none of the options is suitable for your case, for example, if you have Windows Vista installed. After that, you need to press the F10 key again and confirm the changes.
Other ways to fix the error
Sometimes in such situations it turns out that one of the computer modules has failed. In our case, this is most likely the motherboard. To determine its performance, you can use the utility AIDA64 or similar. You can do this without third-party utilities.
- To do this, type devmgmt.msc at the command prompt.
- In the list of devices, select "System devices".
- Right-click your device and select "Properties."
Here you can see the current status of the device. If the error "The BIOS in this system is not fully ACPI compliant" appears, it may be necessary to replace the motherboard.
 (No ratings yet)